-
Getting Started
- Add VisitSafe Track & Trace to your splash page
- Adding a new client account
- Adding another account user
- Downloading your invoices
- Enabling Fydelia Presence Analytics on Cisco Meraki
- FB pixel for Fydelia
- Fydelia Dashboard Overview
- Generating free voucher codes
- Hotel WiFi Features
- How to add a background slider with zoom effect to your guest WiFi splash page
- How to change the redirect URL after successful login
- How to play a video Ad before guest WiFi users can sign on
- iPhone QR scanning won't redirect to captive portal
- Managing your clients with sub-accounts
- Managing your subscription
- Purchasing vouchers with WiFi Pass
- Real time analytics dashboard
- Reports
- Set VAT amount on your WiFi passes
- Simplifying Guest WiFi
- Starting a 14-day trial
- Use your WiFi for COVID-19 Track & Trace
- Using free vouchers in your Fydelia splash page
- Walled Garden and Firewall IP settings
- What is WiFi marketing?
- WiFi Pass overview
- Show Remaining Articles ( 11 ) Collapse Articles
-
- Add VisitSafe Track & Trace to your splash page
- Enabling Fydelia Presence Analytics on Cisco Meraki
- How to add a background slider with zoom effect to your guest WiFi splash page
- How to block a compromised Amazon Firestick
- How to change the redirect URL after successful login
- iPhone QR scanning won't redirect to captive portal
- Walled Garden and Firewall IP settings
-
Integrations
- Build your DotMailer marketing database using WiFI
- Integrating with your TalkBox account
- Send customer WiFi data in real time to your MailChimp email marketing platform
- Send Guest WiFi data to your Campaign Monitor list
- Send guest WiFi data to your SproutSend marketing platform
- Zapier Integration Overview
-
Hardware and Networks
- Accessing your Fydelia dashboard
- Aerohive
- Applying an SSL Certiificate to your MikroTik HotSpot
- Aruba - built in controller
- Aruba InstantOn
- Cambium - Setup guide
- Cisco Meraki
- Cisco Mobility Express
- Configuring your UniFi Splash page
- Connecting your UniFi Access Point
- Creating a FortiNet External Captive Portal
- Creating a Fydelia captive HotSpot portal on a MikroTik RouterBoard
- Creating a MikroTik Hotspot on a VLAN
- Creating an Admin user in a UniFi Controller (Classic Interface)
- Creating an Admin user in a UniFi site
- Creating an EnGenius splash page
- Datto OpenMesh Setup Guide
- DrayTek Vigor 28xx
- Enabling your splash page on your UniFi network
- External Captive Portal with OC200 V1.2.3
- Finding and editing your splash page
- Fydelia UniFi Managed Controller
- Guest Email validation with MikroTik
- Guest internet Voucher coupon generation on MikroTik
- How to redirect D-Link Nuclias guests to a Fydelia external captive portal
- How to set up a captive portal with Cisco Meraki
- How to set up an External Captive Portal with a UniFi Controller
- IgniteNet ecCloud External Captive Portal setup
- Integrating Fydelia with EnGenius EZMaster
- Migrating UniFi APs to another controller
- Ruckus - SmartZone Setup Guide
- Ruckus - ZoneDirector Setup Guide
- Setting up voucher pages with Plasma Cloud
- SonicWall - Setup guide
- Step by Step : Connecting a UniFi Access Point
- UniFi Hotspot Manager
- UniFi known issue: Problems connecting with Laptops
- UniFiOS captive portal splash page setup
- Walled Garden and Firewall IP settings
- What is PoE?
- Show Remaining Articles ( 25 ) Collapse Articles
-
- Accessing UDM Pro directly from the WAN
- Configuring your UniFi Splash page
- Connecting your UniFi Access Point
- Creating an Admin user in a UniFi Controller (Classic Interface)
- Creating an Admin user in a UniFi site
- Enabling your splash page on your UniFi network
- Fydelia UniFi Managed Controller
- How to set up an External Captive Portal with a UniFi Controller
- Migrating UniFi APs to another controller
- Step by Step : Connecting a UniFi Access Point
- UniFi Hotspot Manager
- UniFi known issue: Problems connecting with Laptops
- UniFiOS captive portal splash page setup
Print
Guest internet Voucher coupon generation on MikroTik
When you create new vouchers on the Fydelia portal in conjunction with MikroTik hardware, you will need to create Users and User Profiles on the RouterBoard that correspond with the various voucher durations.
For example if you create a 1 day voucher (1440 minutes), you must ensure that a user exists named “Fydelia_1440”.
NOTE: This works for any duration, even custom ones. Just make sure that the format of the username is always Fydelia_<time_in_minutes>
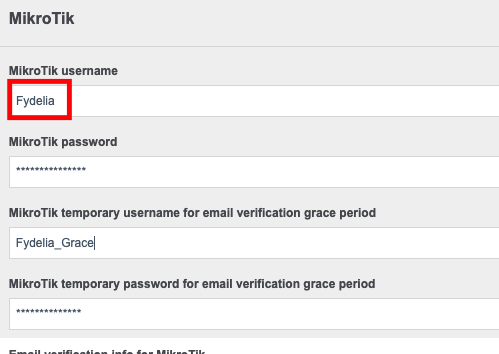
The steps required are:
- Create the voucher user and profile in MikroTik
- Use the same password as specified on your MikroTik voucher form
Creating a voucher user and profile in MikroTik
Creating the Profile
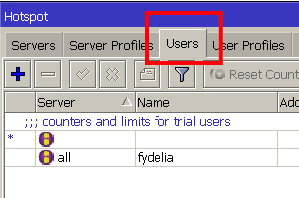
- In the IP section click Hotspot
- Choose the user Profiles tab
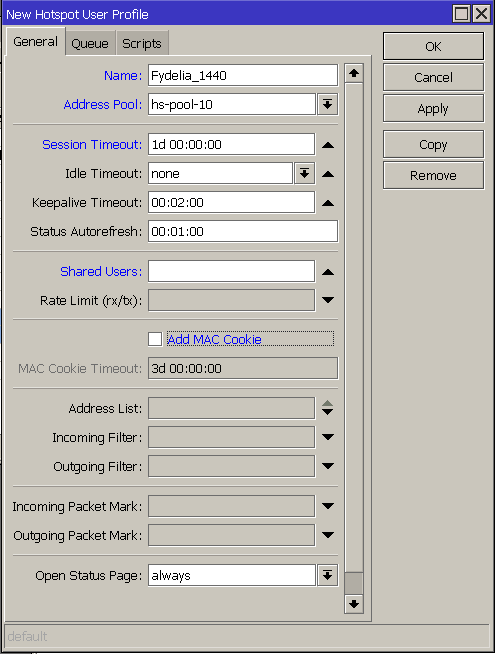
- Provide some name for the profile such as “Fydelia_1440”. It’s not too important but having meaningful names is useful
- Specify the session length you would like guests to be granted for the voucher period. In this demo we’re using 1 day (1440 minutes) as a voucher period

Notes on this screenshot:
- Session timeout set to 1 day
- Shared users removed (unlimited)
- Do not choose MAC Cookie as this has a different session timeout and handling
- Apply and save the setting
Creating the User
- Choose the Users tab

- Click Add New
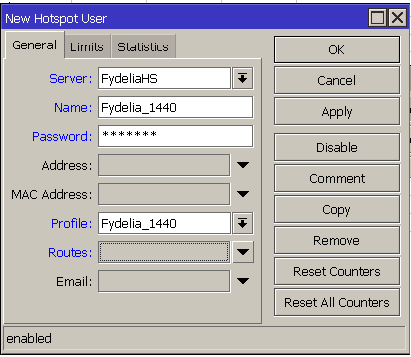
- Choose Server (the Hotspot you created)
- Enter a Name corresponding to the duration, such as: Fydelia_1440
- Enter a password (you will need this later)
- Choose the profile you selected in the previous step. This assigns the 1 day session length to this user
- Apply and save the setting

NOTES:
- The password should match the password you have specified in your Fydelia splash page MikroTik form settings
- You should be using the MikroTik Voucher form (not the standard email form)
You’re all set. Your guests will now be able to access the internet using the corresponding voucher codes you have generated in the portal
Table of Contents